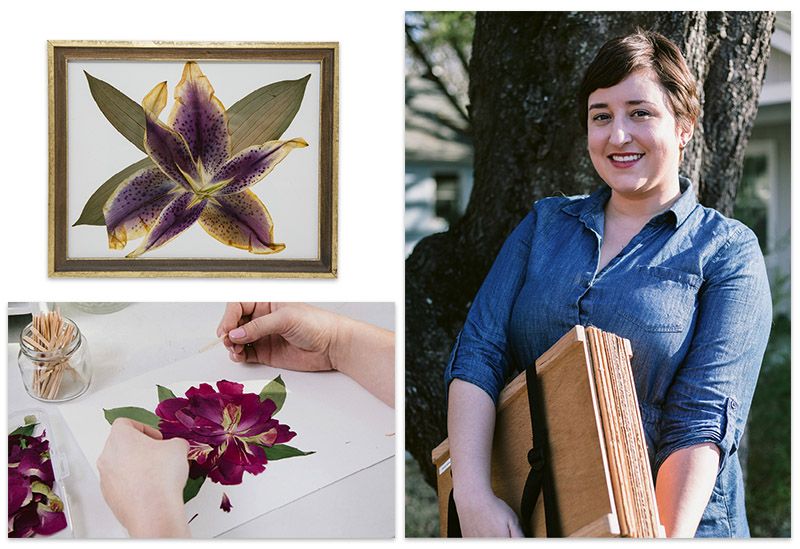
Southern Bloom Press makes modern pressed flower art
Lauren Whiteside Mann’s next flower-pressing class is on May 31 at West Elm; find details at southernbloompress.com.
Lauren Whiteside Mann may have been the youngest person to tote a flower press and tweezers to the World Wide Pressed Flower Guild conference in Pennsylvania last March, but at home in Charleston, the owner of Southern Bloom Press is drawing quite the young, hip crowd to classes and pop-up shops at the likes of Cannonborough Collective, The Skinny Dip, and West Elm. “From interior design to fashion, there’s an obsession with botanicals right now,” notes Mann, and the trend has brought flower pressing back into vogue.
Mann’s own childhood interest in the art was reawakened in 2016 when she wanted to preserve her bridal bouquet. After translating the arrangement into a piece of wall art, she began using wildflowers from the wedding to make gifts for family and friends. She was hooked—so much so that she launched Southern Bloom despite a day job at College of Charleston.
“Pressing flowers really isn’t complicated,” she encourages. Presses are inexpensive to buy or make, and plant materials are probably right outside your door. “Hydrangeas, impatiens, irises, lilies, and ferns all are great to start with,” says Mann. Cut flowers and leaves away from stems and place them individually into a press; after three or four weeks, reveal the results and start designing.
How to Make Pressed Flower Art
Follow Southern Bloom Press’s steps for pressing and designing
Supply List:
Acid-free craft glue
Blotter paper or watercolor paper
Phone book, other heavy type of book (without glossy pages) or wooden flower press
Plant Material: Look for flowers and plants that are fresh and in bloom. In May, you might find hydrangeas, impatiens, irises, lilies, and ferns.
Picture frame
Scissors
Toothpicks
Tweezers
Watercolor paper
Flower Press Method:
1. Prepare your workstation and place flower press on a flat and solid service, such as a desk or kitchen counter.
2. Start with one layer of cardboard in the bottom of the press.
3. Place a piece of blotter or watercolor paper on the top of the cardboard.
4. Select fresh and undamaged plant material.
5. Cut the individual blooms and leaves with scissors. Cut stems off flowers and press the stems separately.
6. Place the blooms and leaves on the paper face-down. Make sure to leave enough space (half an inch to an inch) around each bloom or leaf so that they do not touch.
7. Place another piece of paper on top of the plant specimens.
8. Cover the paper with a second piece of cardboard.
9. Repeat steps 5 to 8 until your flower press is filled.
10. Place the top of the wooden press. Fasten the press with nuts, bolts, and washers or straps—whatever your wooden flower press may use.
11. Store the press in a cool and dry spot, such as a bookshelf or desk. Avoid placing it in sunlight.
12. Wait approximately 4 weeks, then open the press.
13. Remove dried plant materials and store them in acid-free, airtight containers.
Telephone Book Method:
1. Please note the telephone book or hardback book method is typically only used for very thin plant specimens. You can press thicker plant material, but the quality of pressed material will vary.
2. Begin about 30 pages back from the telephone book or a quarter of the way back in a hardback book.
3. Select fresh and undamaged plant material.
4. Cut the individual blooms and leaves with scissors. Cut stems off flowers and press the stems separately.
5. Cover first section of plant specimens with approximately 30 pages of the book, and continue layering until you have filled the book or you have run out of plant material. If you prefer, you can add blotter paper or copy paper inside the book’s pages to keep the ink from discoloring the blooms and to avoid damaging the pages.
6. Stack several other books (at least 15 to 20 pounds of weight) on top of the pressed flower book.
7. Wait approximately 4 weeks, then open the press.
8. Remove dried plant materials and store them in acid-free, airtight containers.
Design:
1. Start by choosing which plant specimens you’d like to use in your design.
2. Cut a sheet of watercolor paper or acid-free paper to fit the size of the picture frame.
3. Draft your design by arranging blooms and leaves on the sheet of paper.
4. Once you have an idea of the design, begin to glue plant material to paper. Place tip of toothpick in glue and dot the plant material with glue.
5. Repeat until you have all plant material glued to paper.
6. Let design dry completely before placing the design in the frame.
Helpful Hints:
1. Select the freshest undamaged plant specimens. If the flower is torn or has brown spots, it will not press well.
2. Sunny days are the best for collecting plant material from your garden. Avoid picking plant specimens after a heavy rain. Avoid unnecessary moisture.
3. Try picking a variety of different plant specimens at different stages.
4. For thicker flowers with lots of blooms, disassemble the flower by pressing each individual flower petal.
5. When using a book, use one that you do not mind damaging the pages.
6. Do not have a fan running, as light blooms and leaves can fly off the press.
7. Wait at least 4 weeks to open your press or book. Avoid peeking, even though it is hard to wait!
8. Keep stored plant material in acid-free containers or folders and avoid sunlight.
9. Use a label maker or sticky note to record the date and type of pressed plant specimen.
Photographs by (Southern Bloom Press-3) Upper King Photography